
How to Adjust your VorMax Toilet Flush Valve Settings
Follow along with this helpful video for instructions on how to adjust your VorMax Toilet Flush Valve settings.
STEP 1: Begin by turning off the water supply. Then, drain the tank by holding down the handle or lifting the valve chain inside the tank.
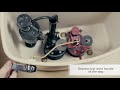
STEP 2: Depress the trip lever all the way – make sure the hook is fully engaged under the tab on the valve body. If not, slightly adjust the screw to make sure the hook is engaged.
STEP 3: Adjust the screw on the teeter bar so that the back of the flapper touches the frame stop.
STEP 4: Turn the water supply back on. To ensure the water level is properly set, measure ¼” from the top of the overflow tube. That is where the water should stop.
STEP 5: Prime the bowl by flushing approximately 5 times – with 30 second intervals between flushes.
Your VorMax toilet is now ready for use.
Learn More from American Standard
 LIFE.LOVE.HOME
Create An Account
*Required Fields
Setting The Standard
RESET YOUR PASSWORD
Enter your email address and we'll send you an email with a link to reset your password.
 ELEGANCE ENGINEERED TO ENDURE