
Untitled Document
A Step-by-Step Guide to Installing a Kitchen Faucet
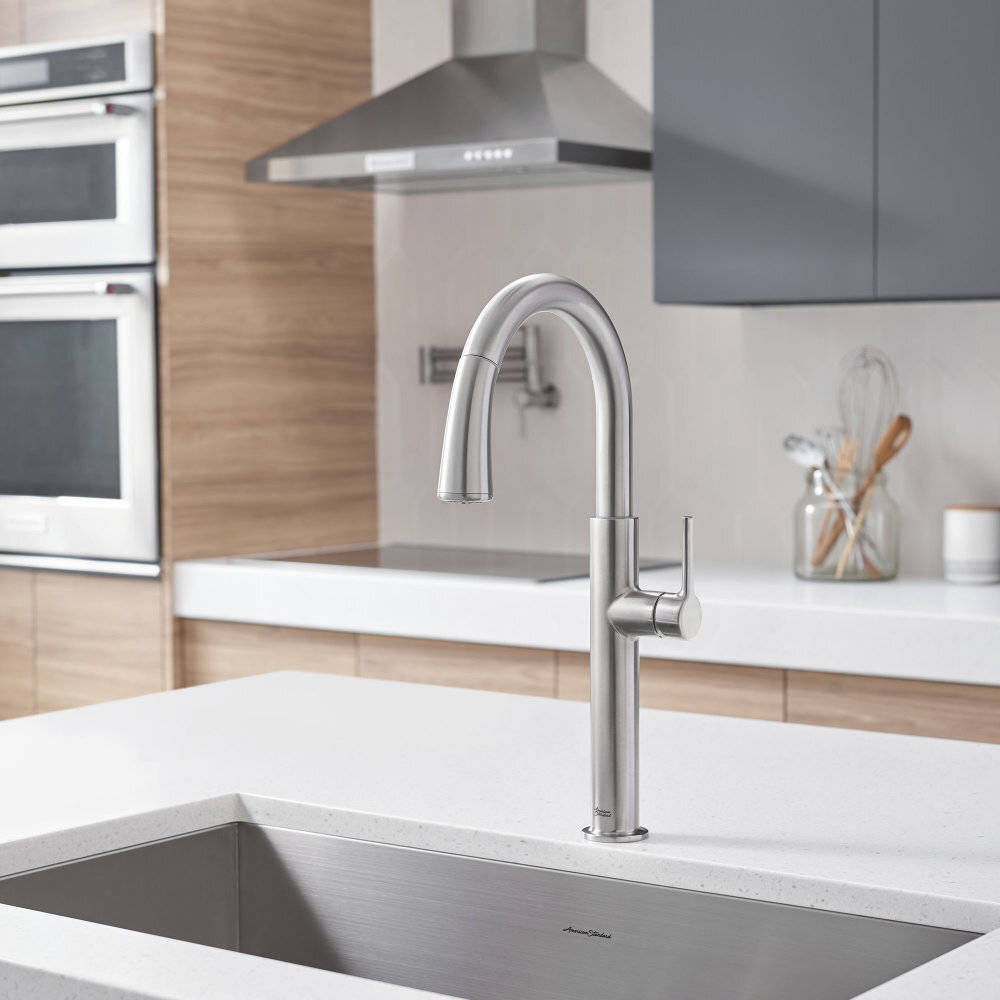
Installing a new kitchen faucet is an easy and affordable way to reinvigorate your space. With a few common tools, you can easily install or replace your existing faucet without worry or hassle.
 Before getting started, you’ll need the right tools to successfully install your brand new kitchen faucet:
● Flat-head screwdriver
Before getting started, you’ll need the right tools to successfully install your brand new kitchen faucet:
● Flat-head screwdriver
● Phillips-head screwdriver
● Adjustable wrench
● Pipe wrench
● Plumbers’ putty or caulking (optional)
● Bucket (optional)
● Old rags/towels (optional)
● Flashlight (optional)
● Tape measure (optional)
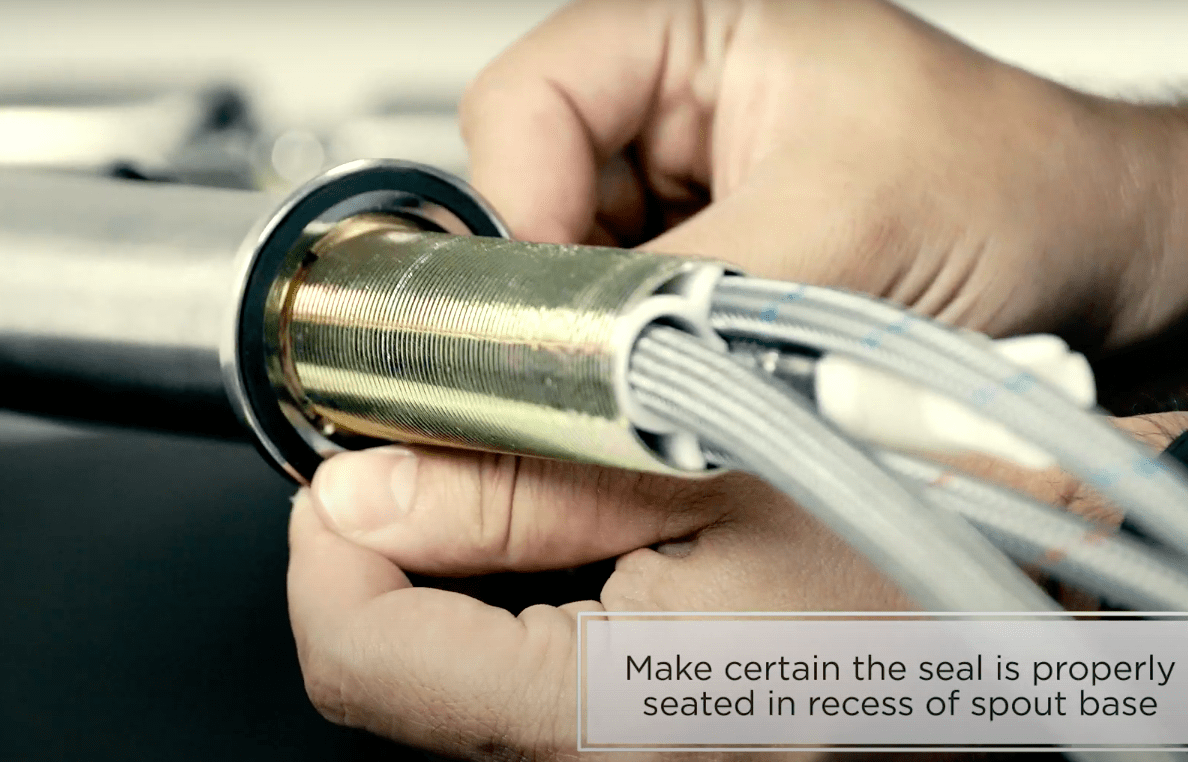
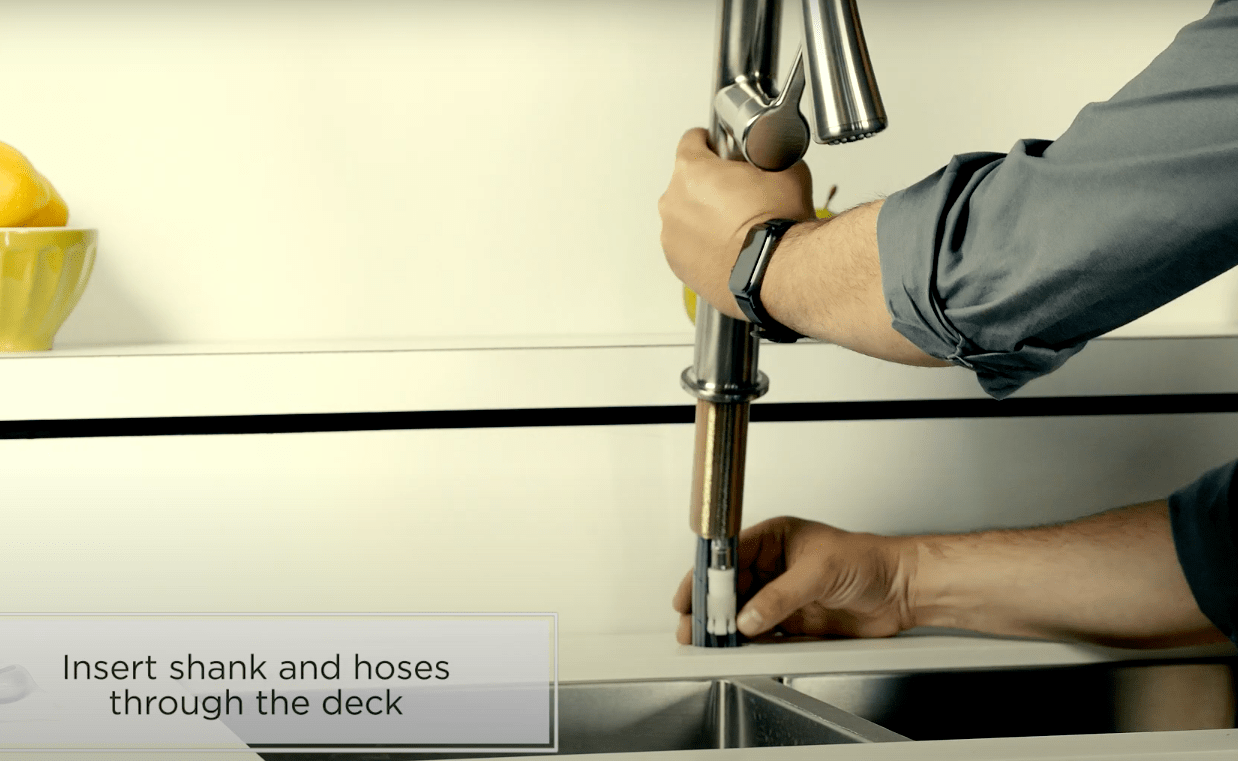
STEP 1
First, you’ll need to turn off the water supply. You must then make sure that the seal is properly seated in the recess of the spout base. Follow through by inserting all hoses and shank through the mounting ring and mounting surface. You should refrain from using putty for this step.
 STEP 2
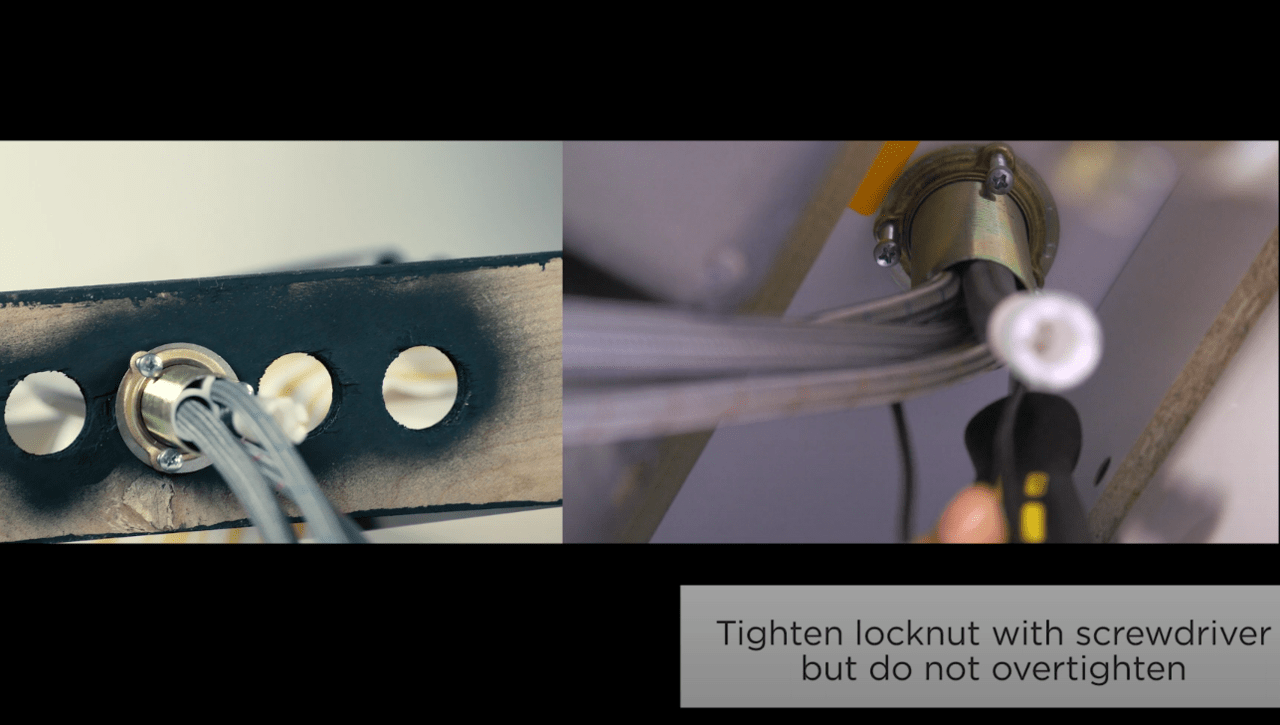
Next, you will feed the hoses through the rubber washer, brass washer, and threaded locknut onto the shank from underside the sink or mounting surface. You must then tighten the locknut, and use a screwdriver to tighten the screws located on the locknut. Then, you will work your way around the locknut, tightening the screws slightly until all are snug. This will ensure even pressure, and may impact the faucet’s performance if completed incorrectly.
 STEP 3
When you have successfully completed the first two steps, you will then connect the flexible supply hoses directly to the wall supplies. First, you will connect the red nylon braided supply hose to the hot wall supply, and then the blue nylon braided supply hose to the cold water supply. You must use an adjustable wrench to carefully tighten the connections, being mindful of potential overtightening.
 STEP 4
Finally, you will need to push the spray hose end into the hose connector, and slide down the locking collar until it snaps into place. With the hand spray seated in the spout, install the weight, and then secure it in place with a screwdriver.
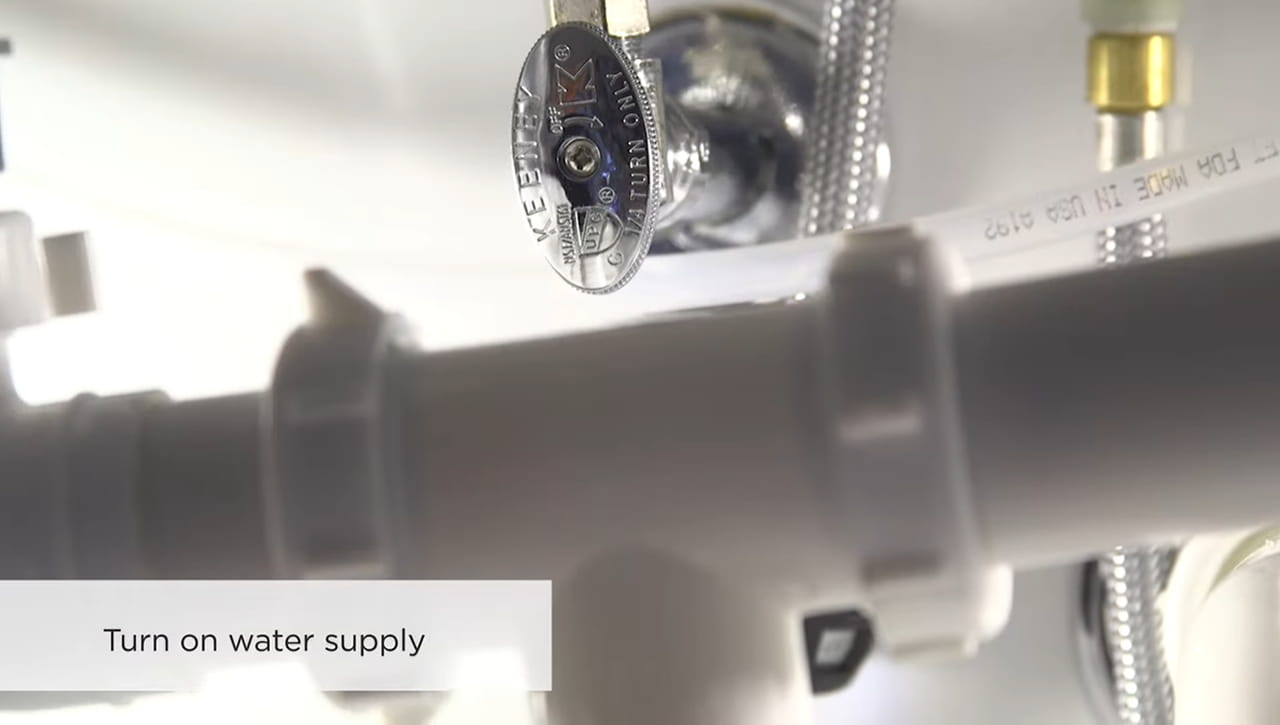
 STEP 5
You may then turn the water supply back on, and begin enjoying your brand new kitchen faucet.
Installing a new kitchen faucet is an easy and affordable way to reinvigorate your space. With a few common tools, you can easily install or replace your existing faucet without worry or hassle.
Before getting started, you’ll need the right tools to successfully install your brand new kitchen faucet:
● Flat-head screwdriver
● Phillips-head screwdriver
● Adjustable wrench
● Pipe wrench
● Plumbers’ putty or caulking (optional)
● Bucket (optional)
● Old rags/towels (optional)
● Flashlight (optional)
● Tape measure (optional)
● Phillips-head screwdriver
● Adjustable wrench
● Pipe wrench
● Plumbers’ putty or caulking (optional)
● Bucket (optional)
● Old rags/towels (optional)
● Flashlight (optional)
● Tape measure (optional)
STEP 1
First, you’ll need to turn off the water supply. You must then make sure that the seal is properly seated in the recess of the spout base. Follow through by inserting all hoses and shank through the mounting ring and mounting surface. You should refrain from using putty for this step.
STEP 2
Next, you will feed the hoses through the rubber washer, brass washer, and threaded locknut onto the shank from underside the sink or mounting surface. You must then tighten the locknut, and use a screwdriver to tighten the screws located on the locknut. Then, you will work your way around the locknut, tightening the screws slightly until all are snug. This will ensure even pressure, and may impact the faucet’s performance if completed incorrectly.
Next, you will feed the hoses through the rubber washer, brass washer, and threaded locknut onto the shank from underside the sink or mounting surface. You must then tighten the locknut, and use a screwdriver to tighten the screws located on the locknut. Then, you will work your way around the locknut, tightening the screws slightly until all are snug. This will ensure even pressure, and may impact the faucet’s performance if completed incorrectly.
STEP 3
When you have successfully completed the first two steps, you will then connect the flexible supply hoses directly to the wall supplies. First, you will connect the red nylon braided supply hose to the hot wall supply, and then the blue nylon braided supply hose to the cold water supply. You must use an adjustable wrench to carefully tighten the connections, being mindful of potential overtightening.
When you have successfully completed the first two steps, you will then connect the flexible supply hoses directly to the wall supplies. First, you will connect the red nylon braided supply hose to the hot wall supply, and then the blue nylon braided supply hose to the cold water supply. You must use an adjustable wrench to carefully tighten the connections, being mindful of potential overtightening.
STEP 4
Finally, you will need to push the spray hose end into the hose connector, and slide down the locking collar until it snaps into place. With the hand spray seated in the spout, install the weight, and then secure it in place with a screwdriver.
Finally, you will need to push the spray hose end into the hose connector, and slide down the locking collar until it snaps into place. With the hand spray seated in the spout, install the weight, and then secure it in place with a screwdriver.
STEP 5
You may then turn the water supply back on, and begin enjoying your brand new kitchen faucet.
You may then turn the water supply back on, and begin enjoying your brand new kitchen faucet.
Click here to check out our beautiful faucet collection and find the right one for your kitchen space.
Love, American Standard
This step-by-step guide was created specifically for our Studio S Kitchen Faucet, but can be used to guide you through our other faucet product installs as well.
Click here to check out our beautiful faucet collection and find the right one for your kitchen space.
Love, American Standard
This step-by-step guide was created specifically for our Studio S Kitchen Faucet, but can be used to guide you through our other faucet product installs as well.


Learn More from American Standard
 LIFE.LOVE.HOME
Create An Account
*Required Fields
Setting The Standard
RESET YOUR PASSWORD
Enter your email address and we'll send you an email with a link to reset your password.
 ELEGANCE ENGINEERED TO ENDURE